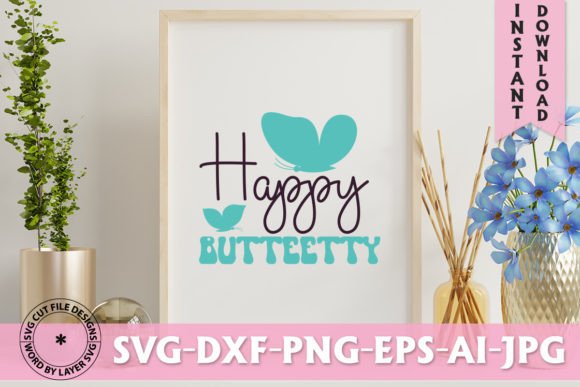
Happy Butteetty Retro Design: What You Get and How to Use It Without Common Pitfalls
If you have come across the term Happy Butteetty Retro Design, you are likely looking for a playful, nostalgic aesthetic that stands out on apparel, home decor, or digital projects. Retro-inspired graphics have become increasingly popular for their ability to evoke warmth, whimsy, and a sense of familiarity. But what does this particular design actually include, and more importantly, how do you use it correctly to avoid frustration? Many buyers jump in without understanding what they are downloading, which file format to use, or how to match the product to their specific software or cutting machine. That is where this article helps.
Below, we break down exactly what the Happy Butteetty Retro Design package contains, common mistakes people make when handling digital design files, and practical steps to get the best results every time. Whether you are a hobbyist with a new Cricut or a professional illustrator working in Adobe Illustrator, these insights will save you time, money, and wasted materials.
What Is the Happy Butteetty Retro Design Package?
This is a digital download only product. No physical item ships to your home. Instead, you receive a single .zip file containing seven individual files, each suited for a different use case or software environment. Understanding each format is the first step toward a smooth creative process. The package includes:
- 1 SVG File – Word-by-layer SVG files compatible with Cricut Design Space and similar cutting software.
- 1 EPS File – A vector file that remains editable in programs like Adobe Illustrator and Inkscape.
- 1 PNG File – 300 DPI, transparent background, ideal for web use, mockups, or print projects.
- 1 DXF File – An AutoCAD-compatible vector file useful for certain cutting machines and CAD software.
- 1 AI File – Native Adobe Illustrator source file for full layer editing and customization.
- 1 JPEG File – Preview image for quick reference, not intended for production use.
Having all these formats in one download means you can work across platforms without converting or redrawing the design. But that convenience only helps if you actually use the right file for the right task.
Common Mistake #1: Using the Wrong File for Your Machine or Software
This is the most frequent error, and it often leads to wasted time and frustration. Many users open the PNG in Cricut Design Space and wonder why they cannot separate the layers or why the background appears jagged. The PNG is excellent for mockups or print projects, but it is not ideal for cutting vinyl because it is a raster image. For layered cuts on a Cricut or Silhouette, the SVG file is your best friend.
Why this matters: Using a raster file for cutting forces the machine to trace around shapes, which can produce rough edges, extra nodes, or unexpected cut lines. You may also lose the ability to separate colors into individual layers, defeating the purpose of a multi-layer design.
Better approach: Before you import anything, check your software or machine requirements. If you use Cricut Design Space, import the SVG file directly. If you work in Adobe Illustrator, open the AI or EPS file. For Silhouette Studio, the DXF or SVG usually works well. Reserve the PNG for previews, social media, or print-on-demand mockups.
Common Mistake #2: Overlooking the Importance of Layer Organization in SVG Files
The SVG file in this package is described as “word by layer,” meaning each word or element in the design sits on its own separate layer. This is a significant advantage because it allows you to recolor, resize, or rearrange individual components without affecting the rest. However, some users import the SVG and see everything grouped as a single object, then assume the file is broken.
Why this happens: Certain software programs, including older versions of Cricut Design Space, may import SVGs with layers intact but collapse them into a single group by default. The layers are still there, but you need to ungroup or use the “Release Compound Path” or “Ungroup” function.
Better approach: After importing the SVG into your software, look for an ungroup or release option. In Cricut Design Space, select the design, then click “Ungroup” in the Layers panel. In Adobe Illustrator, right-click and choose “Ungroup” (you may need to do this multiple times). Once separated, you can assign different colors to different words, resize individual elements, or hide parts you do not need. This simple step transforms a static design into a fully customizable asset.
Common Mistake #3: Ignoring the Transparent Background Requirement for PNG Files
The PNG file in this package is delivered with a transparent background at 300 DPI. That makes it ready for overlaying on photos, products, or digital compositions. But a transparent background only helps if you actually use it correctly. Some users open the PNG in a basic image viewer, see what looks like a blank or checkerboard area, and assume the file is corrupted.
Why this matters: If you place the PNG onto a white background in a design tool like Canva or Photoshop without preserving transparency, you may end up with an unwanted white box around the design. That defeats the purpose of the transparent format.
Better approach: When using the PNG, insert it into a program that supports transparency (Photoshop, GIMP, Canva, Procreate, etc.). Do not flatten the image until you have it positioned exactly where you want it. If you need to save it again, always export as PNG (not JPEG) to preserve transparency. This is especially important for product mockups, stickers, or layered digital art.
Common Mistake #4: Not Unzipping the .zip File Properly
This sounds basic, but it causes more support requests than almost anything else. The entire package comes as one .zip file. If you try to open files directly from within the zip without extracting them, some programs will not read the SVG or AI correctly, or they will display an error.
Why this matters: Zipped files are compressed archives. Opening them in-place can cause file corruption, missing metadata, or incomplete loading. You also cannot edit or import files directly from the zip in most cutting software.
Better approach: Right-click the .zip file after downloading, select “Extract All” (Windows) or “Archive Utility” (Mac), and choose a location you can easily find, such as your Desktop or Documents folder. Once extracted, you will see the individual files. Import the SVG, EPS, DXF, or AI file into your software from that folder. This small habit prevents countless headaches.
Common Mistake #5: Overlooking Software Compatibility Before Purchase
The product description clearly states compatibility with Cricut, Silhouette, Inkscape, Adobe Photoshop, and Adobe Illustrator. However, some users assume that because one file type works everywhere, all files do. For instance, the DXF file is optimized for AutoCAD and certain cutting machines, but it may not preserve all design elements when opened in a general-purpose vector editor. Similarly, the EPS file is best opened in Adobe Illustrator or Inkscape, not in a web browser.
Why this matters: If you try to open the EPS in a basic preview program, you will likely see nothing or a broken image. If you use the DXF in a program that does not fully support the format, you may lose layers or see distorted shapes. This can make the design seem defective when the issue is simply a format mismatch.
Better approach: Check which software or machine you own, then confirm which file format is recommended. For Cricut users, the SVG is the safest choice. For Adobe Illustrator users, the AI or EPS file offers full editability. For Silhouette users, try the DXF or SVG. Keep the other files as a backup, but always start with the format that matches your primary tool.
Common Mistake #6: Assuming All Layers Are Pre-Separated for Cutting
The SVG is described as “word by layer,” which is a strong indication that each word sits on its own layer. That is helpful for multi-color vinyl projects. But some users assume that the design is already perfectly separated into color groups with offset lines, ready to cut without adjustment. That is not always the case.
Why this matters: Even with layered SVG files, you may need to assign colors manually, adjust spacing, or add a small offset (weld) to ensure clean cuts. If you load the SVG and cut as-is without reviewing the layers, you might end up with overlapping pieces or gaps that do not align.
Better approach: After importing the SVG and ungrouping, take a moment to review each layer in your software. Assign a distinct color to each section you plan to cut separately. In Cricut Design Space, use the “Attach” or “Weld” functions to keep parts together where needed. If you are cutting vinyl, also add a small offset (about 0.01–0.02 inches) to prevent the adhesive backing from showing between colors. This extra step makes the final project look professional rather than amateur.
Common Mistake #7: Neglecting to Check the Preview JPEG Before Cutting
The package includes a JPEG preview image. This file is included so you can quickly see what the design looks like without opening a vector editor. Yet many users skip this file and jump straight to cutting, only to discover later that the colors or layout were not what they expected.
Why this matters: The JPEG shows the intended arrangement of words and elements. If you rely solely on the file name or a thumbnail, you may misjudge the scale, orientation, or composition. That is especially risky when working with retro designs that often use overlapping or offset text.
Better approach: Open the JPEG preview before you start editing. Use it as a visual reference to understand how the final design should look. This helps you confirm that each layer is correctly positioned and that no element is accidentally deleted or hidden during editing.
Practical Advice for Getting the Most from This Design
Now that you know what to avoid, here is a straightforward workflow that works for most users, whether you are a beginner or a seasoned creator:
- Download and extract the .zip file to a dedicated folder on your computer. Do not open files directly from the zip.
- Open the JPEG preview to see the intended design layout. Keep it open as a reference.
- Choose the correct file for your software. For Cricut Design Space, use the SVG. For Illustrator, use AI or EPS. For Silhouette, try DXF or SVG. For mockups or print, use the PNG.
- Ungroup the design in your software to access individual layers. In Cricut Design Space, click Ungroup. In Illustrator, select the design and choose Object > Ungroup until all elements are separate.
- Assign colors and adjust layers as needed. Use the preview JPEG to guide your choices. If you plan to cut vinyl, assign each color to a separate layer and add a small offset for alignment.
- Test with a small project first. Cut a single word or element on scrap material before committing to a full sheet. This confirms that the file imports correctly and that your machine settings are dialed in.
- Save your working file in your software’s native format (e.g., .ai, .svg) so you can revisit or modify it later without starting over.
By following these steps, you avoid the most common pitfalls that lead to wasted vinyl, ruined projects, and frustration. The Happy Butteetty Retro Design package gives you a solid foundation, but the quality of the final product still depends on how you handle those files.
Final Considerations Before You Buy or Use This Design
Before purchasing any digital design, it pays to confirm a few details. First, verify that your cutting machine or software supports at least one of the file formats included. If you only have access to a basic image viewer, for example, the SVG, EPS, and DXF will not be usable. Second, understand that digital downloads cannot be returned, so take a moment to review the product description thoroughly. Third, remember that the file is delivered as a .zip archive, and you will need extraction software (most modern computers have this built in).
If you are comfortable with these points, the Happy Butteetty Retro Design package is a versatile and well-prepared set of files that can be used across many projects. The retro aesthetic works well for t-shirts, tote bags, wall art, mugs, stickers, scrapbook pages, and digital invitations. The multiple formats mean you are not locked into one platform or workflow. Just take the time to match the right file to the right task, and you will get professional results every time.
Good design starts with understanding the tools you have. Now you have both the knowledge and the files to make something great.